
I really like experimenting with different designs on my nails and I decided to show you one of them. If you like this "tutorial" then I will show you many more. So let's begin....

I. Products:

This is a colorful, yet not too bright design which is easy to recreate and everything you need is different color nail polishes. These are the products I used, but any similar colors will work. Also, if you feel like experimenting, you can choose different ones- let your imagination run wild.
1.Rapsodi Pasific Vitamin E & Ceramider Nail Lacquer in the shade 31 (or an electric bluish green color)
2. Mina Nail Art Striping Brush in Bottle (a.k.a. striper =D) in the shade 57 (just a regular black)
3. Mina Nail Art Striping Brush in Bottle in the shade 33 (a bright or even neon purple)
4. Mina Nail Art Striping Brush in Bottle in the shade 35 (or another neon orange color)
5. VeryMe Nail Paint Base & Top Coat by Oriflame Cosmetics (or find a base color and a clear top coat)
6. Rapsodi Pasific Vitamin E & Ceramider Nail Lacquer (I am not sure about the shade because the previous bottle broke, but you need a light non-glitter grey)
II. Steps:
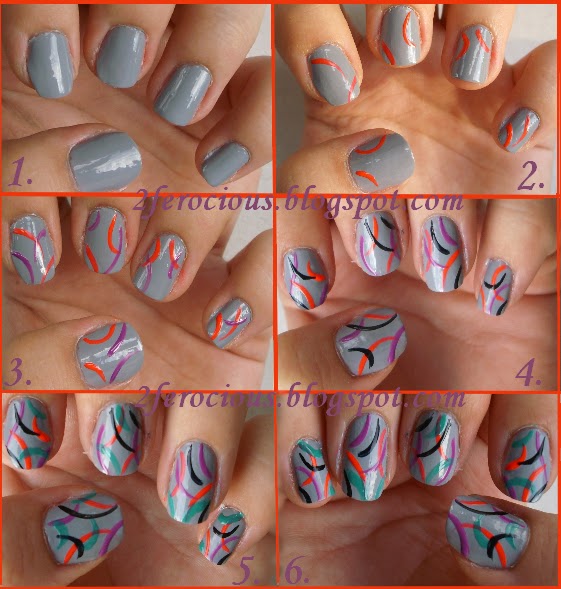
0. You want to begin by applying a clear base coat which will protect your nail from discoloration and will also make your nail polish go on more easily and stay longer without chipping.
1. After that pain your nails two thin coats of a grey nail polish. If your nail polish doesn't have a very thick consistency you may need to go over your nails a third time but that's OK.
2. When your nails are dried choose the colors that you are going to do the stripes in. I recommend not doing more than 5 colors because it may get too much, but if you have big nails you can add another color. The first color I chose was a bright neon orange. I decided to do two stripes on each nail, but you can make them different (a nail with 1 stripe, the one next to it with 2, etc.). You want to do the lines slightly curved as if you are drawing a new moon. You can do them from all sides and in all directions- it's your choice.
3. Now you want to take your second color. In my case- purple. Again you can do as many stripes as you want and you can make them whatever lenght and in whatever direction you want.
4. I suggest you make sure to put black stripes, because they will immediately pop out on the grey base and make your design more eye-catching. This is the third color, so if the previous two don't cross, you definitely want to cross them with the black and the fourth colour. The reason for this is that the design will look more natural and fun.
5. If you decide you want to add a fourth color- do. I chose an electric bluish green color which really complements the orange and even the purple. After you are done with your design let it dry for a few minutes.
6. Finish off by applying a top coat which will seal your desing and make it even more beautiful. An optional step is to apply a fast-drying spray.
I really hope you like this easy and colorful design. If you end up trying it out please send me an e-mail or comment below and show me your recreation. Also, this will be the first post in my series of nail designs, so look out for more soon.
xoxo,
HriS
No comments:
Post a Comment